|
|
|
SEND FREE SMS TO
WARID,UTL,CELTEL & MTN
|
FASHION
 
|
|
 |
Find out more about computer related issues from here. Learn how to work with computers, printers, scanners and other devices around you just with us.

FREE TUTORIALS
Most Common Computer Problems
| ference |
Issue / Question |
|
|
I have problems in Windows after installing new software. |
|
|
How do I fix illegal operations?
My computer displays a blue screen after booting, what can i do to solve this problem? |
|
|
My computer is running slow what steps can I do to fix it?
Do you need ant-virus soft ware ? |
|
|
How to fix an invalid page fault.
I need to increase Security to my files and folders to access by other people. |
|
|
How to fix a fatal exception error. |
|
|
How to fix a general protection fault |
|
|
Runtime errors.
My computer dispalys error messages every time. |
|
|
Divide error. |
|
|
Issues relating to msgsrv32.
My Web browser can not open any web page and yet am connected to the internet? |
|
|
My computer displays a black screen & the word "NTLDR" missing after powering it?
Why do Windows programes stop responding? |
|
|
I need to regain my computer hard disk drive space. |
|
|
Windows restarts without warning me. |
We Can fix that for you.
|
Computer turns off without warning.
Computer displays, "your memory is running low" what can i do ? |
let us know.
|
Windows freezes or stops responding. |
We have the solution for that
|
What should I do when a computer freezes? |
|
|
Not a valid win32 application.
I need to upgrade to Windows Vista Inspirat |
|
|
Missing Microsoft Windows applications.dll files. |
Question
& Answer |
Section containing a listing of all our questions and answers. |
 FORUM FORUM |
If your question is not listed on this page please try send it to us through our mail box . |
1. If the computer is frozen and will not respond to any commands, it may be necessary to press Ctrl + Alt + Del (all three keys at the same time) to bring up the Task List. Select any program that says "Not responding" and click the End Task button. Repeat until all tasks are ended. If this does not work, turn the computer off, wait several seconds, turn the computer back on, and let the computer run the Scandisk.
2. Reboot it. A majority of problems that occur while you are using your computer can be fixed by rebooting. Applications sometimes don’t release memory like they should when they are finished. The end result is your computer locks up or acts really weird. When you reboot, memory registers are cleared and most everything is reset. This fixes a lot of problems.
Special Note
It doesn't hurt a computer to leave it running all the time. However, using the computer for long periods of time causes small problems that can build into larger ones. When Windows reboots, it fixes most of these small problems. Therefore, restarting the computer periodically while working can help reduce the risk of glitches.
Check all the connections, the cables between the CPU and the monitor and all the electrical cables. Check the wall socket or surge strip to see if they are bad (sometimes a surge strip will have good and bad outlets). If you have a green light on your monitor but not on your CPU, then there is a problem with your CPU. If there is a green light on your CPU and not your monitor, then you have a problem with your monitor and your CPU may be fine. If you have another monitor that you know is good, the quickest way to test is to put another monitor on the machine and see if you get an image on the screen. If you have a light on both the monitor and the CPU, check the pins of the data cable between the monitor and the CPU. A single bent pin can cause an image problem.
1. Press Ctrl + Alt + Del (all three keys at the same time) to bring up the Task List. Select any program that says "Not responding" and click the End Task button. Repeat until all tasks are ended. Check periodically to see if the keyboard will work.
2. Check to make sure the keyboard is still properly connected to the computer. If the keyboard has been disconnected, you may have to reboot your computer.
3. If all else fails, then turn the power off. Wait a couple of minutes before turning the computer back on.
Special Note
One of the dirtiest parts of your computer is the keyboard. Regular cleaning will help keep the keyboard working properly. First, blow compressed air through the spaces in between the keys to remove dust and lint. If you shake your keyboard upside-down this will also remove some of the particles.
Check to make sure the mouse is still properly connected to the computer. If the mouse has been disconnected, you may have to reboot your computer.
Like the keyboard, the mouse pad is sitting in the open most of the time getting dusty, wet, slimed, or anything else that happens on you desktop. The mouse then rolls over whatever has collected on the mouse pad and gets inside, gumming up the works. To clean the mouse pad, wipe it off occasionally with a damp cloth or get a new one.
1. You may have left a disk in the A drive. Remove it and press any key on the keyboard to reboot the computer.
2. If you don’t have a disk in the A drive, and the message is accompanied by a "clunking" sound, turn the computer off and send for a technician.
At times your computer could develop a problem which causes you machine to boot up in what is called "safe mode". The easiest way to try and solve this problem is to run a "scandisk".
1. Click on Start, Programs, Accessories, System Tools, and Scandisk.
2. Place a check on "Automatically fix errors".
3. When Scandisk finishes, reboot your computer to see if this fixed the problem.
4. If the computer still boots up in the Safe Mode, click on Start, Programs, Accessories, System Tools, and Disk Defragmenter. If you receive the message "You don't need to defragment this drive now", continue with the process anyway.
5. When Disk Defragmenter is finished, reboot your computer to see if this fixed the problem.
6. If the computer still starts up in safe mode, you need to contact a computer technician.
If the printer will not print at all, you need to determine if the printer itself will not work or if it is not receiving a print message from the computer.
1. Many models have a built-in self test option which allows you to print a test page by holding down the feed button for a few seconds. The power button will begin to flash and a test page will print. If the printer self test fails, your problem is with the printer itself rather than the printer cable or computer. Should this occur, you should contact a technician.
2. If the printer self test prints, the next step is to have Windows print a test page. Click on Start, Settings, Printers, and right click on the icon of the printer with the problem. Select properties and press the Print Test Page button. If the test page fails to print, make sure the printer cable is firmly seated in both the computer and the printer. You should also check the ends of the printer cable to make sure that none of the prongs are bent. If the test print fails, or if the print consists of nonsense characters or a few characters printed over many pages, you need to uninstall then reinstall the drivers for your printer.
Paper feed problems and jams can often be resolved by using paper which conforms with the specifications provided by the printer manufacturer. On ink jet printers, the rubber rolls which pick up each sheet can sometimes become coated with paper residue which decreases the friction. Cleaning off the residue can sometimes solve paper feed problems.
Special Note
If your ink jet printer is making a banging or grating noise, you need to clean two areas of the printer.
1. Some models of ink jet printers have a gray colored narrow plastic film which extends almost the whole width of the printer just behind the rod on which the print head travels. If this film gets dirty, the print heads can have problems determining where it is and can crash against the end of the printer. Use tissue or soft cloth to clean this strip.
2. The printer head moves across a rod that can also become dirty. With the printer power on, raise the front of the printer and clean the rod with a paper towel. Put the front of the printer back down and turn off the printer. This time when you lift the front of the printer, the printer heads will move across the rod. This will allow you to clean the part of the rod that was covered when you cleaned it the first time. If you spray the paper towel with WD-40, this will do a better job of cleaning the rod.
As the printer gets older, it may become necessary to perform these two cleaning jobs at least once a weak.
CAUTION!!! ALWAYS REMEMBER THAT IT'S VERY RISKY AND DANGEROUS TO REPAIR ANY OF YOUR MACHINES WITHOUT ANY PRIOR TECHNICAL KNOWLEDGE. IT IS ALWAYS RECOMENDED THAT YOU CALL A TECHINICIAN.
Basic Microsoft Windows XP troubleshooting.
Issue:
Basic Microsoft Windows XP troubleshooting.
Additional information:
This document has been created as a location of general steps that can be taken to help you with problems you may be experiencing with Microsoft Windows XP that are either general problems and/or problems not documented elsewhere in the Computer Hope database.
Below are some reasons why a user may follow the steps in this document.
- Unknown or undocumented problem with computer running Microsoft Windows XP.
- Performance issues with the computer, for example, the computer running slowly.
- Users who wish to run maintenance on the computer or potentially speed up the computer.
- Users looking for steps to help resolve an issue or that may help locate the cause of an issue.
Users may find explicit documented questions and answers on our Windows XP Q&A page. Additional information about Windows XP can also be found on our Windows XP main page.
Solutions:
Error messages encountered during boot before Windows loads
Before following the below steps please make sure that the error you are encountering is not already documented on Computer Hope by performing a quick search for the error and by looking through our Windows XP Q&A page.
- Ensure that your computer BIOS settings are correctly configured to the hardware that is installed in your computer. Improper settings in the BIOS may cause various types of errors when first booting an IBM compatible computer. These errors often occur as the computer is first booting and may stop the load process of the computer.
Error messages while Windows is loading
Errors that occur while Windows XP is loading and/or or prevent Windows XP from loading are likely being caused by a configuration error in the registry.
- If you have recently changed or installed something that could have caused Normal Windows to stop loading, try loading the last known good configuration. Additional information about how to do this can be found here.
- If you are unable to get into Normal Windows and believe that removing or uninstalling a program or changing a setting may help enable you to get into Windows, boot the computer into Windows XP Safe Mode.
- If your computer has worked fine in the past but recently has been experiencing the issue you're encountering, run the System Restore option to restore the computer to an earlier date.
Other error messages that occur while Windows is loading or after Windows is loaded
Errors that have occurred while Windows is loading and/or after Windows has completed loading are often caused by a program that is automatically loading each time Windows is loading, problem or misconfiguration of a hardware device, or computer virus.
- If errors occur but Microsoft Windows still loads, verify no issues or conflicts exist in Device Manager. If errors are found, read through our Device Manager page for steps on resolving issues.
- Ensure that if programs are loading automatically that these errors are not associated with these programs. Many times utilities such as virus programs may attempt to load when Windows first starts and cause errors to occur. If you believe that your startup errors are associated with another program, please refer to our basic software troubleshooting.
- Make sure Windows XP is up to date by checking Microsoft Windows update page.
- If your computer has a virus protection program installed, make sure it is up to date and that no viruses are being detected. If your computer does not have a virus protection program, you may wish to consider installing a program to make sure no viruses are causing your problems.
- If your computer has worked fine in the past but recently has been experiencing the issue you're encountering, run the System Restore option to restore the computer to an earlier date.
Other error messages
If you are experiencing other error messages, it is likely these errors are being caused by the software program you are running and/or a hardware device you are attempting to utilize. It is recommended you see the basic troubleshooting section for your hardware device or software program.
Computer running slowly
- Make sure your computer has at least 500MB of free hard disk drive space. If your computer has less than 500MB free, it may cause the computer to operate more slowly.
- Run Microsoft Scandisk and Defrag on the computer. Additional information and help with these commands can be found on our scandisk page and our defrag page.
- Close any programs that are running in the background and/or disable background programs from automatically loading each time your computer boots.
- Click Start, Search, and click For Files or Folders. In the search window, search for files named *.tmp and make sure you are searching or looking in the local C: drive. Once search has completed, delete any files found.
- Ensure that no errors or conflicts exist in the Device Manager.
- Make sure Windows XP is up to date by checking Microsoft Windows update page.
- Ensure your computer has the latest drivers for the hardware devices installed in your computer.
- If your computer has a virus protection program installed, make sure it is up to date and that no viruses are being detected. If your computer does not have a virus protection program, you may wish to consider installing a program to make sure no viruses are causing your problems.
- If your computer has worked fine in the past but recently has been experiencing the issue you're encountering, run the System Restore option to restore the computer to an earlier date.
Issue with hardware device
If you are having difficulties with a hardware device, please see our basic troubleshooting section for steps that can be taken to help resolve your hardware issues.
Other
If you are still running into errors or unable to resolve your issue, please search our web page, check our on-line help section, and check our Q&A section for additional help and/or recommendations. If after checking these locations you are still unable to resolve your issue, feel free to contact our support team.
MANUPLATING WINDOWS OPERATING SYSTEMS.
In order to be able to complete the installation procedure smoothly, you should collect certain information about your system before beginning the installation. Often the installation utility will be able to determine your system configuration automatically but when it fails to do so, you must be prepared to supply the needed information. Otherwise, you'll be forced to terminate the installation procedure, obtain the information, and restart the installation.
To obtain this information, you can consult your system documentation and the documentation for any devices installed by you. If your documentation is missing or incomplete, you may need to contact your hardware vendor or manufacturer. Alternatively, you may be able to find the needed information on the manufacturer's web site; use a search engine such as Yahoo! or AltaVista to discover the URL of the web site.
Configuration Information Needed to Install Linux
|
Device
|
Information needed
|
|
Hard Drive(s)
|
The number, size, and type of each hard drive.
Which hard drive is first, second, and so on
Which adapter type (IDE or SCSI) is used by each drive.
For each IDE drive, whether or not the BIOS is set for LBA mode
|
|
RAM memory
|
The amount of installed RAM
|
|
CD-ROM Drive(s)
|
Which adapter type (IDE, SCSI, or other) is used by each drive
For each drive using a non-IDE, non-SCSI adapter, the make and model of the drive
|
|
SCSI Adapter (if any)
|
The make and model of the card
|
|
Network Adapter (if any)
|
The make and model of the card
|
|
Mouse
|
The type (serial, PS/2, or bus)
The protocol (Microsoft, Logitech, MouseMan, etc.)
The number of buttons
For a serial mouse, the serial port to which it's connected
|
|
Video Adapter
|
The make and model of the card
The amount of video RAM
|
To obtain the needed information, you may need to examine your system's BIOS settings or open your system's case and examine the installed hardware. Consult your system documentation to learn how to do so.
If you run Microsoft Windows 95 or Windows 98, you can obtain much of the needed information by using the Windows System Properties dialog box, which you can launch by using the Control Panel:
-
Click on the Start menu. A popup menu appears.
-
Select Settings on the popup menu and click on Control Panel in the submenu. The Control Panel appears.
-
Double click on System. The System Properties dialog box appears. If necessary, click on the General tab, so that the dialog box resembles
The General tab of the System Properties dialog box shows the type of your system's processor and the amount of installed RAM.
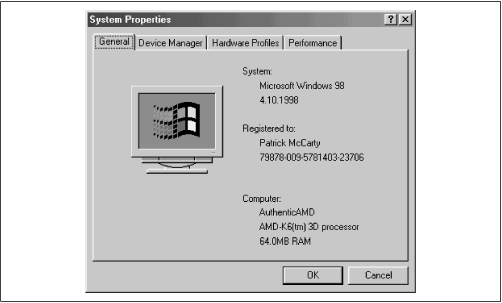
-
Click on the Device Manager tab.
You can double click on an icon (or single click on the plus key adjacent to an icon) to obtain additional information. For example, by double clicking on the Disk Drives icon you can determine whether a disk drive uses an IDE or SCSI interface.
If you have a printer, you can use the Print button to print information about your system's devices.
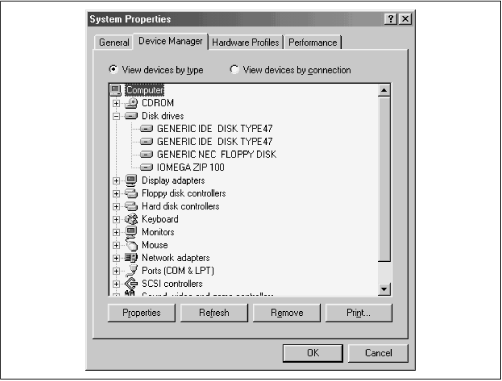
From the Device Manager tab, you can learn the following information:
-
The number and type (IDE or SCSI) of your system's hard drives.
-
The make and model of CD-ROM drives.
Some installed CD-ROM drives do not appear in the Device Manager tab of the System Properties dialog box. Often the CONFIG.SYS file will contain clues that help you learn more about such drives.
-
The type of mouse installed.
-
The make and model of the video adapter.
-
The make and model of multimedia adapters, such as sound cards, if any.
-
The make and model of network adapters, if any.
-
The make and model of SCSI adapters, if any.
AMI BIOS beep codes
Below are the AMI BIOS Beep codes that can occur. However, because of the wide variety of different computer manufacturers with this BIOS, the beep codes may vary.
| Beep Code |
Descriptions |
Document |
| 1 short |
DRAM refresh failure |
Contact us for more information |
| 2 short |
Parity circuit failure |
Contact us for more information |
| 3 short |
Base 64K RAM failure |
Contact us for more information |
| 4 short |
System timer failure |
Contact us for more information |
| 5 short |
Process failure |
Contact us for more information |
| 6 short |
Keyboard controller Gate A20 error |
Contact us for more information |
| 7 short |
Virtual mode exception error |
Contact us for more information |
| 8 short |
Display memory Read/Write test failure |
Contact us for more information |
| 9 short |
ROM BIOS checksum failure |
Contact us for more information |
| 10 short |
CMOS shutdown Read/Write error |
Contact us for more information |
| 11 short |
Cache Memory error |
Contact us for more information |
| 1 long, 3 short |
Conventional/Extended memory failure |
Contact us for more information |
| 1 long, 8 short |
Display/Retrace test failed |
Contact us for more information |
AWARD BIOS beep codes
Below are Award BIOS Beep codes that can occur. However, because of the wide variety of different computer manufacturers with this BIOS, the beep codes may vary.
| Beep Code |
Description |
Document |
| 1 long, 2 short |
Indicates a video error has occurred and the BIOS cannot initialize the video screen to display any additional information |
CH000607 |
| Any other beep(s) |
RAM problem. |
CH000996 |
If any other correctable hardware issues, the BIOS will display a message.
IBM BIOS beep codes
Below are IBM BIOS Beep codes that can occur. However, because of the wide variety of models shipping with this BIOS, the beep codes may vary.
| Beep Code |
Description |
Document |
| No Beeps |
No Power, Loose Card, or Short. |
Contact us for more information |
| 1 Short Beep |
Normal POST, computer is ok. |
No problem |
| 2 Short Beep |
POST error, review screen for error code. |
See screen |
| Continuous Beep |
No Power, Loose Card, or Short. |
|
| Repeating Short Beep |
No Power, Loose Card, or Short. |
|
| One Long and one Short Beep |
Motherboard issue. |
|
| One Long and Two Short Beeps |
Video (Mono/CGA Display Circuitry) issue. |
|
| One Long and Three Short Beeps. |
Video (EGA) Display Circuitry. |
|
| Three Long Beeps |
Keyboard / Keyboard card error. |
|
| One Beep, Blank or Incorrect Display |
Video Display Circuitry. |
|
Macintosh startup tones
| Tones |
Error |
| Error Tone. (two sets of different tones) |
Problem with logic board or SCSI bus. |
| Startup tone, drive spins, no video |
Problem with video controller. |
| Powers on, no tone. |
Logic board problem. |
| High Tone, four higher tones. |
Problem with SIMM. |
Phoenix BIOS beep codes
Below are the beep codes for PHOENIX BIOS Q3.07 OR 4.X
| Beep Code |
Description / What to Check |
| 1-1-1-3 |
Verify Real Mode. |
| 1-1-2-1 |
Get CPU type. |
| 1-1-2-3 |
Initialize system hardware. |
| 1-1-3-1 |
Initialize chipset registers with initial POST values. |
| 1-1-3-2 |
Set in POST flag. |
| 1-1-3-3 |
Initialize CPU registers. |
| 1-1-4-1 |
Initialize cache to initial POST values. |
| 1-1-4-3 |
Initialize I/O. |
| 1-2-1-1 |
Initialize Power Management. |
| 1-2-1-2 |
Load alternate registers with initial POST values. |
| 1-2-1-3 |
Jump to UserPatch0. |
| 1-2-2-1 |
Initialize keyboard controller. |
| 1-2-2-3 |
BIOS ROM checksum. |
| 1-2-3-1 |
8254 timer initialization. |
| 1-2-3-3 |
8237 DMA controller initialization. |
| 1-2-4-1 |
Reset Programmable Interrupt Controller. |
| 1-3-1-1 |
Test DRAM refresh. |
| 1-3-1-3 |
Test 8742 Keyboard Controller. |
| 1-3-2-1 |
Set ES segment to register to 4 GB. |
| 1-3-3-1 |
28 Autosize DRAM. |
| 1-3-3-3 |
Clear 512K base RAM. |
| 1-3-4-1 |
Test 512 base address lines. |
| 1-3-4-3 |
Test 512K base memory. |
| 1-4-1-3 |
Test CPU bus-clock frequency. |
| 1-4-2-4 |
Reinitialize the chipset. |
| 1-4-3-1 |
Shadow system BIOS ROM. |
| 1-4-3-2 |
Reinitialize the cache. |
| 1-4-3-3 |
Autosize cache. |
| 1-4-4-1 |
Configure advanced chipset registers. |
| 1-4-4-2 |
Load alternate registers with CMOS values. |
| 2-1-1-1 |
Set Initial CPU speed. |
| 2-1-1-3 |
Initialize interrupt vectors. |
| 2-1-2-1 |
Initialize BIOS interrupts. |
| 2-1-2-3 |
Check ROM copyright notice. |
| 2-1-2-4 |
Initialize manager for PCI Options ROMs. |
| 2-1-3-1 |
Check video configuration against CMOS. |
| 2-1-3-2 |
Initialize PCI bus and devices. |
| 2-1-3-3 |
Initialize all video adapters in system. |
| 2-1-4-1 |
Shadow video BIOS ROM. |
| 2-1-4-3 |
Display copyright notice. |
| 2-2-1-1 |
Display CPU type and speed. |
| 2-2-1-3 |
Test keyboard. |
| 2-2-2-1 |
Set key click if enabled. |
| 2-2-2-3 |
56 Enable keyboard. |
| 2-2-3-1 |
Test for unexpected interrupts. |
| 2-2-3-3 |
Display prompt "Press F2 to enter SETUP". |
| 2-2-4-1 |
Test RAM between 512 and 640k. |
| 2-3-1-1 |
Test expanded memory. |
| 2-3-1-3 |
Test extended memory address lines. |
| 2-3-2-1 |
Jump to UserPatch1. |
| 2-3-2-3 |
Configure advanced cache registers. |
| 2-3-3-1 |
Enable external and CPU caches. |
| 2-3-3-3 |
Display external cache size. |
| 2-3-4-1 |
Display shadow message. |
| 2-3-4-3 |
Display non-disposable segments. |
| 2-4-1-1 |
Display error messages. |
| 2-4-1-3 |
Check for configuration errors. |
| 2-4-2-1 |
Test real-time clock. |
| 2-4-2-3 |
Check for keyboard errors |
| 2-4-4-1 |
Set up hardware interrupts vectors. |
| 2-4-4-3 |
Test coprocessor if present. |
| 3-1-1-1 |
Disable onboard I/O ports. |
| 3-1-1-3 |
Detect and install external RS232 ports. |
| 3-1-2-1 |
Detect and install external parallel ports. |
| 3-1-2-3 |
Re-initialize onboard I/O ports. |
| 3-1-3-1 |
Initialize BIOS Data Area. |
| 3-1-3-3 |
Initialize Extended BIOS Data Area. |
| 3-1-4-1 |
Initialize floppy controller. |
| 3-2-1-1 |
Initialize hard-disk controller. |
| 3-2-1-2 |
Initialize local-bus hard-disk controller. |
| 3-2-1-3 |
Jump to UserPatch2. |
| 3-2-2-1 |
Disable A20 address line. |
| 3-2-2-3 |
Clear huge ES segment register. |
| 3-2-3-1 |
Search for option ROMs. |
| 3-2-3-3 |
Shadow option ROMs. |
| 3-2-4-1 |
Set up Power Management. |
| 3-2-4-3 |
Enable hardware interrupts. |
| 3-3-1-1 |
Set time of day. |
| 3-3-1-3 |
Check key lock. |
| 3-3-3-1 |
Erase F2 prompt. |
| 3-3-3-3 |
Scan for F2 key stroke. |
| 3-3-4-1 |
Enter SETUP. |
| 3-3-4-3 |
Clear in-POST flag. |
| 3-4-1-1 |
Check for errors |
| 3-4-1-3 |
POST done--prepare to boot operating system. |
| 3-4-2-1 |
One beep. |
| 3-4-2-3 |
Check password (optional). |
| 3-4-3-1 |
Clear global descriptor table. |
| 3-4-4-1 |
Clear parity checkers. |
| 3-4-4-3 |
Clear screen (optional). |
| 3-4-4-4 |
Check virus and backup reminders. |
| 4-1-1-1 |
Try to boot with INT 19. |
| 4-2-1-1 |
Interrupt handler error. |
| 4-2-1-3 |
Unknown interrupt error. |
| 4-2-2-1 |
Pending interrupt error. |
| 4-2-2-3 |
Initialize option ROM error. |
| 4-2-3-1 |
Shutdown error. |
| 4-2-3-3 |
Extended Block Move. |
| 4-2-4-1 |
Shutdown 10 error. |
| 4-3-1-3 |
Initialize the chipset. |
| 4-3-1-4 |
Initialize refresh counter. |
| 4-3-2-1 |
Check for Forced Flash. |
| 4-3-2-2 |
Check HW status of ROM. |
| 4-3-2-3 |
BIOS ROM is OK. |
| 4-3-2-4 |
Do a complete RAM test. |
| 4-3-3-1 |
Do OEM initialization. |
| 4-3-3-2 |
Initialize interrupt controller. |
| 4-3-3-3 |
Read in bootstrap code. |
| 4-3-3-4 |
Initialize all vectors. |
| 4-3-4-1 |
Boot the Flash program. |
| 4-3-4-2 |
Initialize the boot device. |
| 4-3-4-3 |
Boot code was read OK. |
Black borders on side of screen.
Issue:
Black borders on side of screen.
Cause:
This issue can be caused by any of the below possibilities on CRT monitors (standard computer display):
- Video driver issue or no video driver installed
- Resolution was changed and monitor could not adjust.
- Monitor needs to be manually adjusted.
- Older computer monitor
This issue can be caused by any of the below possibilities on LCD displays (flat panel / laptop):
- Widescreen display
- LCD limitation
CRT Monitor Solution:
Video driver issue or no video driver installed
Verify you have the latest video driver installed on your computer.
Resolution was changed and monitor could not adjust
If the resolution was recently changed it is possible for the monitor to not auto adjust or shift to the correct size. If this occurs, the resolution can be changed back to the original setting or you can manually adjust the monitor as instructed below.
Monitor needs to be manually adjusted
If a black border exists on the monitor it can generally be resolved by manually adjusting the horizontal or vertical width. Because each monitor is different, the method of adjusting this setting will vary; consult your monitor documentation. Older monitors may not have the feature to adjust the horizontal setting; if this is the case, refer to the below notes:
Older computer monitor
It is possible for older monitors (generally 15" monitors). When this is not available it is generally due to the monitor design and it should be expected to see some black on the left and right of the monitor. If you believe this black area is to big, we recommend you contact your monitor manufacturer for additional information.
LCD Display Solution:
Video driver issue or no video driver installed
Verify you have the latest video driver installed on your computer.
Widescreen display
If you're using a widescreen LCD display and you're running a non-widescreen resolution or the program, game, or movie you watching does not support widescreen it is normal for the display to have large black borders on the left and right-hand sides of the image.
Microsoft Windows:
Make sure to change your resolution settings in Microsoft Windows to a resolution that supports widescreen.
DVDs:
Many DVDs support both widescreen and full screen mode. If you're using a widescreen LCD display make sure to display the movie in widescreen format. Additionally you can change the aspect ratio in many DVD programs to fit your display.
LCD limitation
LCD displays are designed and work differently from the standard CRT monitor found on most computers. Because of this difference, LCD displays will have a set resolution. An example would be a set resolution of 800 x 600. When the resolution is changed to a larger resolution, because the pixel size is different, the size of the display will decrease, causing a black border. To rectify this issue, most LCD displays or laptop manufacturers will have a stretch utility to stretch the pixel size allowing the display to be full screen. This will, however, decrease the quality of the image slightly (this is generally noticeable in the text).
Because the stretch utility, key combination, or method of enabling this feature varies, it is recommended that you contact your laptop or LCD manufacturer for additional information on if this feature is possible and how to enable it.
|
|
Call Us if you failt to that yourself
| Resolved |
Were you able to locate the answer to your questions? |
|
|
|
For more information rich us through the following contact information
Which is (click on the e-mail to conpose message) richy_many2k@yahoo.com
or call +256-752-656594.
|
|
 |
|
|
|
|
|
|
|
|
|
|
|
|
|
|
| |
|
|
|
|
 |
There have been 42967 visitors (176997 hits) To this Website today
 This website was created for free with Own-Free-Website.com. Would you also like to have your own website?
Sign up for free
|


